How to Paint Laminate Cabinets

Nov 19, 2013

I know I'm not the only one that has been completely confused about how to paint laminate cabinets since they are more plastic than wood. All of my bathrooms have them, but the ones in my boys' bathroom was in serious need of a paint job. I remembered seeing a primer at Benjamin Moore a while back that claims to work on wood and plastic. The best part is that it's water based. I've never had good luck with anything other than oil-based paint and primer for wood surfaces, but the long drying time made me want to try this new primer. I'm so glad I did because not only does it dry faster, it's so easy to work with and gives me the same satin feeling results as an oil-based primer and paint. Here's what I used.

The Primer

DSC_3517

The salesman said sanding isn’t necessary with this primer, but I still lightly sanded the surface just to be on the safe side. It is super thick and has the consistency of glue and I was really impressed with how well it bonded to the cabinet. I lightly sanded it again once the primer dried to get a smooth surface for the paint, but was careful not to sand off the primer.

The Paint

DSC_3518

It's hard to see the label because of the paint drip, but it’s Advance waterborne interior alkyd.


Here it is finished!

DSC_3521

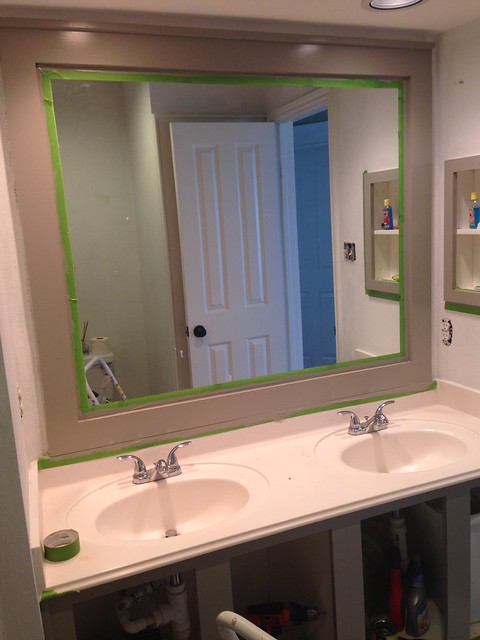
I used Rockport Gray on the cabinets and mirror frame we built. FYI-If you build a mirror frame make sure you paint the back of the wood before you install it. We didn't do that and the white color on the back of the boards is reflected in the mirror. Thankfully, it's only in certain spots and not really noticeable unless you look really close.


DSC_3522

I have three boys, but only one toothbrush is in the holder. Where could the other two be?!


DSC_3523


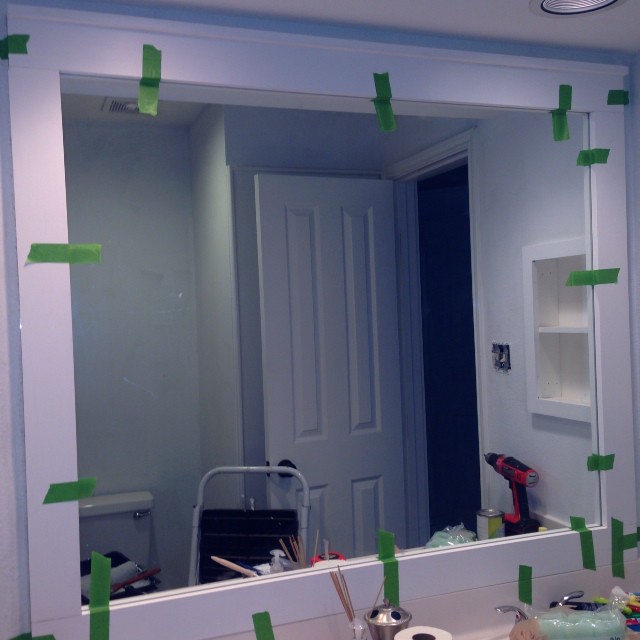
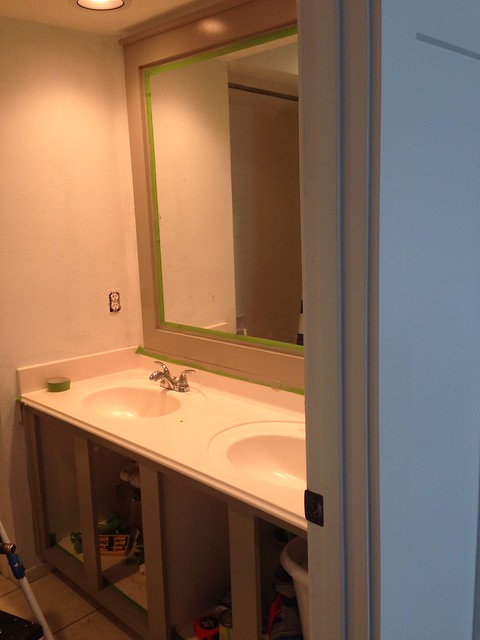
Here's the progress I've made so far.

DSC_3524

Since all three boys share this bathroom, I decided to go with a sports theme since it's something they all like. I couldn't find a cute "locker room" sign that didn't cost a fortune, so I bought a chalkboard sign at World Market and made one myself with a chalk marker. I really need stencils to make the letters look nicer, but I wanted to make sure it would work. The sign also might get a coat of paint.

The shower curtain has been here for a while and I haven't decided if it's going to stay. I'm not sure if I like the navy with the cabinet color. The walls are BM Dove White, which makes the bathroom feel clean even if it is not clean 90% of the time with three boys using it. The pictures over the toilet will be getting new frames, but I'm happy I was able to re-purpose the prints from my son's room. I found a great locker room shelf at Homegoods for a good price that just needed a bit of stainless steel spray paint. I can't wait to accessorize it!

I'm also debating whether to change the hardware from chrome to oil rubbed bronze. I think it would look so much better, but it would be quite expensive and I really just wanted to give this bathroom a mini-makeover with mostly paint. I haven't bought cabinet knobs since I've yet to decide on the hardware color, but just typing this out makes me lean towards the oil-rubbed bronze. What do you think? Once I make that decision and whether to replace the shower curtain I think this makeover will be completed quickly. I'll keep you updated!


Living Room Update

Nov 14, 2013

A few weeks ago I moved my sofa from in front of the windows to face the fireplace. This arrangement never worked with my old leather furniture because it was oversized, but when I saw how nice it looked when Melissa at The Inspired Room did the same I decided to give it a try. I lived with it for a while before I showed you because I wasn’t sure if I’d change it back, but I really like it this way. What do you think?

Before


After

DSC_3511


DSC_3507

Mario's photo bomb.

I’ve had this console table for years and decided to drag it back from the garage to see how it would look behind the sofa. I love a table here, but I’m not sure if I will replace this one or make a DIY project of it. Maybe chalk paint and new knobs?

DSC_3508


The view from the kitchen.

DSC_3510

Yes, that is a Christmas tree! It's not even close to being done, but I just couldn't wait any longer.


DSC_3511


DSC_3524

I love having a new table to decorate. I moved these candles here from my entryway and then added the rest. The horse is from Homegoods and the vases are from Hobby Lobby. My fingers are crossed I don't kill the orchid!


http://thriftydecorchick.blogspot.com/2014/01/january-before-and-after.html


Savvy Southern Style


A Luxe Thanksgiving Wreath

Oct 28, 2013

My crafty side came out of hibernation recently and I decided to make a fall wreath for my dining room this year. I’m not really a fan of wreaths lately for some odd reason, but I came across a gold spray painted magnolia wreath on Pinterest that was simple and elegant. Even though I’m a reluctant crafter I have made several wreaths before and found it pretty easy. Well, not this one! It would have been easy had I known a few things ahead of time. Next time, I’ll actually click on the link and read the directions no matter how simple it looks. I pretty much did it all backwards, but figured it out in the end. Now that my fingers have recovered from the sting of the hot glue gun, I love it and would do it all over again.

DSC_3474

I used fake magnolia leaves, which is easier since you can shape the branches to fit the wreath. I began by taking the leaves off the branches and gluing them to the styrofoam wreath, but it didn’t look quite right because you could tell they were glued and didn’t have a full natural appearance. It looked so much better once I trimmed the stem and shaped the branch to fit the wreath. Then, I hot glued it to the styrofoam. In retrospect, I should have spray painted the leaves gold first because when the branches slipped the unpainted green underneath showed. I had to spray paint it three different times because of this and hot glue it over and over again until it stayed. I can’t tell you how many times I burned my fingers. But, the hardest part is shaping the leaves just right on the edges of the wreath. Make sure to take a few leaves off the branches to hot glue on the edges of the wreath to get a perfect round appearance, or a perfectly imperfect round appearance. Winking smile You’ll also need spare leaves to glue around the sides of the wreath so the styrofoam is completely covered. I also happened to find a few feathers in my attic from years ago that I never used when looking for a wreath hanger. Don’t you have feathers just sitting around in your attic? Well, I never found the hanger and ended up using a Command hook, but the feathers were a great find. I cut them in half and glued them around the wreath and love how it gives it a little oomph.

Here it is on my dining room window.

DSC_3481

I took the blinds down recently and the windows just felt a bit naked despite the new drapes. This window used to be visible from the street, but the fence was moved up in front of it after we built the pool because of the equipment on the side of the house. I love that the window is now in the backyard for more privacy. The drapes still haven’t been ironed, but I’ll get around to it before Thanksgiving…I hope. I bought them at Target for a great deal. I’d love to dress them up a little with some trim and maybe a French pleat at the top. My sewing skills are a bit too beginner right now so I ended up gathering up three pleats and clipping the backs for now with old curtain rings.

DSC_3493

I still have quite a bit to do in here before I can call it done, but it’s coming along!


My New Fall Fashion Essential: Cropped Skinnies

Oct 21, 2013

How was your weekend? Mine was busy with various projects around the house. I finished painting my boys' bathroom, but then I noticed a few missed spots yesterday. Of course! I'll be touching up those today and cleaning up the mess. My boys will be thrilled to get their bathroom back and I'll be thrilled to get them out of mine! I'll show you an update and the painting method I used for the cabinets. I've always sworn by oil-based paint for woodwork, but I used a new hybrid type of latex paint and I'm officially a convert. I also rearranged my living room furniture, bought new drapes for my dining room, started cleaning out the garage, and added a bit of lighting to our backyard. I'll be going into detail on these projects as I finish them up. It wasn't all work and no play this weekend. The weather finally turned cool and we were able to use the fire pits in the backyard last night. We broke out the marshmallows and made s'mores with the kids. I had no idea how nice it would be sitting outside by the fire with my wine and s'mores. I did not want to come inside last night and it was such a great way to finish off the weekend.

Because of the change in weather I'm thinking more about fall clothes. I bought two pair of cropped skinny jeans at Anthropologie recently, white and gray. The best part is they were 70% off! I've always stayed away from cropped jeans because I feel they make my legs look shorter, but I have found ones that are cropped right near the ankle do not visually cut off the length of your leg. Another side benefit is how great they make your foot and ankle look, especially for a cankle sufferer like me. ;)

skinnies : cropped : dark wash :
Miranda Kerr Photo - Miranda Kerr Out in NYC
Olivia Palermo #casual #style
olivia palermo casual style- I just might buy some converse
I love how they can be worn with tennis shoes, heels, boots and flats. I've been wearing mine almost every day dressed up or dressed down. I never thought these would look good on me and avoided this look forever. The terms cropped and skinny made me stay away, but I'm so glad I tried these on. I have to admit the only reason I did was because they were on the sale rack, lol. Have you bought anything new this fall that you just love?


Boys Bathroom Progress

Oct 15, 2013

Blogging about my plans to paint my boys bathroom last week gave me the kick I needed to get started after putting it off for the last ten years. Yes, ten years! This is the only room in the house I've never touched and it really, really showed. I considered taking a before picture, but I could not embarrass myself that way. Just picture lime green walls made special by my little Picasso that even magic erasers could not fix. And, the previous owners loved to faux paint everything. And, I mean everything! Towel holders, the toilet paper holder, light switch plates and even the light switches themselves had splotches of lime green paint on them. I can't tell you the joy it brought me to throw those suckers in the trash. Oh, happy day!

Even though I wimped out on before pictures, I do have progress pics. You may have seen this one on Instagram. The walls and vanity have been primed white in this picture and a new mirror frame was installed by my handy husband who vowed to never use a saw again. Sorry, honey...kind of. He just shouldn't do such a good job and I wouldn't ask. ;)


It didn't stay primer white for long. Despite having a "pitch white" house as my seven year old says, I do like other colors. Since this is the boys bathroom I decided to go with BM Rockport Gray on the vanity and mirror frame. It's a mix of tan and gray, which reminds me of those sweet, dirt covered boys.


I know it looks like a train wreck right now with the paint supplies everywhere and cabinet doors off, but I have a vision! At least that's what I keep telling my family. I'm planning on painting the walls an off white color. I picked up BM White Dove and I'm going to try that out today. Here are a few pictures with light walls and darker vanities that are similar to what I'm planning.
Gray for cabinets
I know it's an office, but I took one look at it and thought the colors would be perfect for the boys bathroom.

Masculine bathroom with grasscloth
Love the mirror!

Boys Bathroom

Boys Bathroom
This is going to mostly be a paint makeover. There won't be awesome wallpaper, wainscoting, or lighting like in these rooms. I'd love to at least replace the countertop one day, but sometimes you've just got to work with what you have. One benefit is that this will be a quick makeover and I should finish this week. I can't wait to be done so I can go shopping for accessories!


My New Favorite Spot: Balcony Reveal

Oct 6, 2013

When we moved into this house almost ten years ago I was thrilled to have a screened balcony off the master bedroom. I thought this was going to be my little sanctuary to read and drink coffee. I had a sunroom in my old home that served this purpose so I moved the same wicker furniture from my old sunroom to recreate my favorite spot outside. The problem was that I had very small kids and wasn’t able to use it since they couldn’t be left alone in the house by themselves. We got rid of the furniture after it warped and never bothered to replace it. This became our area to store tools the past year as we’ve been working on trimwork upstairs. Nice, right? Over the past two weeks I’ve cleaned and decorated this space to make it better than ever. Come outside and let me show you!

DSC_3445


My new favorite spot!

DSC_3432


DSC_3397


Between the the waterfall and the breeze from the ceiling fan it truly feels like I’m at a resort.

DSC_3437


DSC_3443


Mario likes it, too. It turns out this is a great spot to watch squirrels run across the fence.

DSC_3392


Now, for the details. This was a super cheap makeover since so many of the items were on clearance or just a great find.

DSC_3430


Seagrass Chair, Rug and Mirror-Homegoods
Pillow, Vase, Elephant-TJ Maxx
Ottoman-Wal-Mart
Table, Tray, Carafe, Planters, Lanterns-Repurposed


I was feeling more like wine than coffee yesterday since my husband went out of town and left me with the three boys by myself all day. How did I manage the summer? Thank goodness for Mondays!

DSC_3440
DSC_3393
DSC_3434


DSC_3444


DSC_3427


Sharing this post as Remodelaholic and Between Naps on the Porch.


Fall Front Porch

Oct 1, 2013

My front porch got a much needed refresher last week and I've been enjoying every minute of it. I thought I would be the only one to use it, but I've found my boys out here visiting with their friends in the afternoons. Oh, and Mario (my almost one year old puppy) LOVES it out here. It's so nice to have a spot the entire family can use.

image


I decided to work mostly with my existing décor and just add mums, but I couldn't resist a few owl candleholders I spotted at TJ Maxx. Despite using my spring planters and pillows, the mums and pumpkins still make it feel like fall. I'm loving the alternative use of color since it's still very warm and green here in the south.

DSC_3365


DSC_3367


DSC_3374


image

I think this is the perfect place to sit and make my fall bucket list, which I know will include a hayride at a pumpkin patch and making smores in the backyard. What plans do you have this fall?


Linking this post up at Southern Hospitality for a fall outdoor décor party!


Round Top and a Project Sneak Peek

Sep 30, 2013

After several years of reading about other bloggers Round Top Antique Fair experiences I finally made the trip up there myself. I took my friend Lindsay who I knew would love it, possibly more than me. She's new to blogging and you can check out her craftiness here. So, why did it take me so long to get up there? Honestly, I'd never heard of Round Top, Texas. I kept hearing it was in the Hill Country and assumed it was somewhere near Austin or San Antonio, which is several hours away. And, I got it confused with Round Rock, TX that's near Austin. It turns out it is a little over an hour from my house, near Brenham (home of Blue Bell ice cream), if you are an equally confused Houstonian.

You might have seen a few pictures I put on Instagram. I wish I had taken more, but I was so overwhelmed by it all. There are miles and miles of tents along the road. Once we passed Round Top it was even crazier in Warrenton. This is definitely not a place you can go without a plan. Thankfully, I had looked up a few places and had an idea of where to go. One of the top places is Blue Hills. I absolutely loved the French Laundry tent there. They have beautiful bedding and throw pillows at reasonable prices, which is nice since I was surprised at how expensive everything was that day. I did buy these two Christmas stockings for $30 total. My husband gets the manly brown velvet one and the other one is mine. I love that the colors fit right in with my living room.

DSC_3359_edited-1


We headed back to Brenham for lunch and later stopped at Leftovers Antiques that I noticed on the way there. I also read about it on another blog and was intrigued by it. This is truly one of the cutest stores I have ever seen. It's huge for a boutique and we spent so much time looking around that we never made it back to Round Top. I couldn't resist a small Dash & Albert kitchen rug.

DSC_3355_edited-1


DSC_3356_edited-1

I love the way it goes with my Blue Willow dishes, which I appreciate more after seeing how much they goes for in Round Top. I have mixed feelings about this Antique Fair. I was shocked by how expensive and huge it was. I know good deals can be found, but you really have to look. It's just not possible to visit every tent so a plan is a must. I'm not sure I will go back. I typically have a shopping expiration date of two hours and then I want a margarita. ;) I definitely will go back to Leftovers Antiques. They had great gifts, so I'm thinking some time before Christmas I'll make another trip. The day we were there the staff was preparing for a book signing so we got free drinks. I can tell the men really loved that as their wives were shopping, lol. And, guess who the author was? Rachel Ashwell! We missed her by one hour. :(

I've got a new project update and a deal alert! I'm finally fixing up the balcony off my bedroom. I thought this was going to be my space when we moved into this house, but I realized that was impossible with kids. The wicker furniture we had out here warped over the years and I never bothered to replace it since I never used this porch. Now, that my kids are older and I have a pool view it's time to fix this space up. I bought this ottoman yesterday at Wal-Mart for $29.88 to go with a seagrass chair my mom bought me recently. $29.88! It was the last one left so I lunged at it and tucked it safely away in my cart. I could see the envious eyes of other shoppers as they passed me by. However, if you want one take advantage of Wal-Mart's free ship to store policy it's available online.


DSC_3361_edited-1


But, I am in love with this one. Isn't it great? I am trying so hard to find a spot for it in my house right now.

Better Homes and Gardens Pouf Ottoman, Ikat Medallion


I'll be back tomorrow with my fall front porch reveal!